
Almost 20 years ago I met my cosmic twin (or "Deuxling" as we like to call ourselves) Sjouk in art school - surprisingly it wasn't love at first sight, but we gradually discovered we shared the same obnoxious sense of humor and bonded over the love for eighties fashion, food, music, colorblocking, and bold preferably neon colors!
Next to being an amazing friend, she's been one of my most trusted confidants ever since I've started Misusu Patterns. Through the years, she's helped me by voicing her strong opinions & constructive criticism, allowing me to pick her brain and giving me the occasional much needed kick in the butt! She's a true inspiration and I'm in constant clothing-envy over all the awesome things she makes. And today's blog contribution by Sjouk - how to hack a collarless Stereo Sweater - is no exception!
You can find more bold and colorful makes by Sjouk on her Instagram profile!
______________________________________________________________________
Hi all! My name is Sjouk, 37, married to a dairy farmer and together we have 3 kids. I've studied fashion design and psychiatric nursing and found the ideal combination job in running a social workshop/sewing atelier for the salvation army.
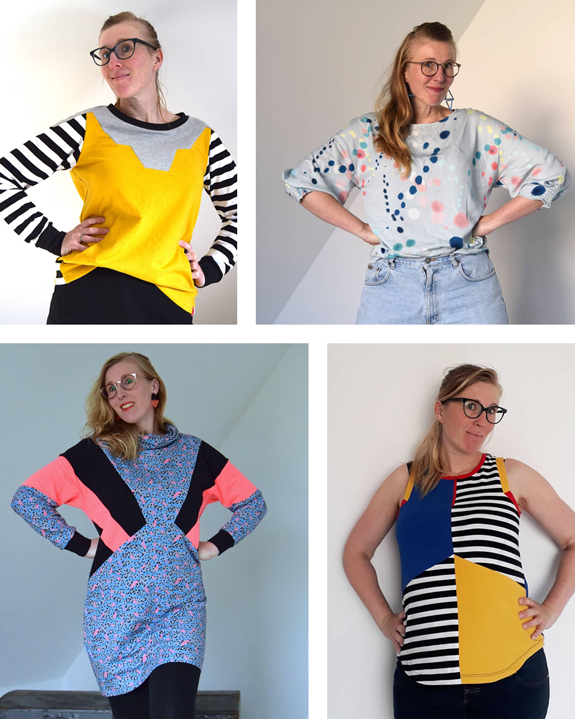
Today I present you my hack on the Stereo: the collarless Stereo! You might think: what is a good Stereo sweater without the collar?! Well, I once found inspiration on the almighty Pinterest and when testing the Stereo sweater I was reminded by this picture:

Initially I wanted to create an exact copy, but I couldn't find the right colour yellow (I'm very, very picky when it comes to colourmatching). So this project was abandoned by the lack of good coloured fabric. But when Elles asked if I was interested in doing a pattern hack for the blog, it suddenly came back to me and I decided to make a new colour scheme!
As a result I now look like Liquorice allsorts (or Engelse drop as we call it in Dutch)!


Step 1 - First, collect all the pattern pieces that are part of the collar, including the insert. In this case it means, the rounded collar, front, middle & back upper sleeve and back bodice.

Step 2 - Start with the collar insert. First, cut the collar in half at the horizontal fold line. Discard the cut off. Next, double the collar towards the left. Draw a curved line by connecting the notches on the sides. When using the rounded collar insert like I did, you can use the rounded bottom seam as a guide line. Add seam allowance at the top of the new insert. Cut along the new seam line and discard the cut off.

Step 3 - Add seam allowance at the top of the new insert. Cut along the new seam line and discard the cut off. Cut the new collar insert twice from the fabric and stitch the top seam before attaching it to the front bodice.
 Step 4 - Collect all the other pattern pieces with a piece of the collar. On all pattern pieces, draw a cutting line following the notches on each sides, the same as we did with the collar insert.

Step 5 - Add seam allowance to all pieces and cut along the new necklines.

Step 6 - First, measure the height of your new front collar insert.

Step 7 - Using the front collar insert measurement, measure down from the top of your collar pattern pieces and draw lines onto your pattern pieces.
 Step 8 - By following the new pattern lines, draw the individual facing pattern pieces onto your pattern (yellow lines). Make sure to exclude the connecting seam allowances (marked with red x) - we're going to create a one-piece collar facing next.
 Step 9 - Starting from the center back, trace the collar facing pattern pieces one by one, by connecting the side seams, this way creating a one-piece (cut on the fold) collar facing. Make sure to carefully connect the top corners. The lower corners can overlap a little. Create nice round lines (pink line) and if needed, adjust the collar pieces accordingly (see middle sleeve adjustment, marked by arrows). Trace all the way around to create your final collar facing.
To make a colorblock front & back bodice, add 1 cm seam allowance to the center front and center back line. Sew fronts and backs together first, then follow the instructions in the Stereo sweater tutorial.

To add a colorblock to the sleeve, draw a horizontal line wherever you wish -mine was 9 cm from the center top. Add 1 cm seam allowance to both cutting lines. Close the seam before continuing with the sleeve part of tutorial.

I hope this will inspire you to make a collarless stereo too! I'm looking forward to all your fancy makes!
Hugs, Sjouk
_______________________________
That's one yummy collarless Stereo sweater, thanks a million Sjouk! Are you hungry for more of Sjouk's tasty makes? Check out her instagram account: @dutch-sjouks. And please tag us @misusupatterns and @dutch-sjouks when you make your own collarless Stereo sweater!!
Happy sewing!
Comments will be approved before showing up.
Subscribe to our newsletter and always be the first to hear about what is happening.
© 2026 Misusu Patterns.
|
Body measurements cm |
Body measurements inch |
||||||||
|
Size |
Age |
Chest |
Waist |
Hip |
Height |
Chest |
Waist |
Hip |
Height |
|
80 |
9-12M |
50 |
48 |
52 |
80 |
19,5 |
19 |
20,5 |
31,5 |
|
86 |
12-18M |
52 |
50 |
54 |
86 |
20,5 |
19,5 |
21,25 |
33,75 |
|
92 |
18-24M |
54 |
51 |
55 |
92 |
21,25 |
20 |
21,5 |
36,25 |
|
98 |
2-3Y |
55 |
52 |
57 |
98 |
21,75 |
20,5 |
22,5 |
38,5 |
|
104 |
3-4Y |
56,5 |
53,5 |
59 |
104 |
22,25 |
21 |
23,25 |
41 |
|
110 |
4-5Y |
58 |
55 |
61 |
110 |
22,75 |
21,5 |
24 |
43,25 |
|
116 |
5-6Y |
60 |
57 |
64 |
116 |
23,5 |
22,5 |
25,25 |
45,5 |
|
122 |
6-7Y |
62,5 |
58,5 |
67 |
122 |
24,5 |
23 |
26,5 |
48 |
|
128 |
7-8Y |
65 |
60 |
70 |
128 |
25,5 |
23,5 |
27,5 |
50,5 |
|
134 |
8-9Y |
67,5 |
61,5 |
73 |
134 |
26,5 |
24,25 |
28,75 |
52,75 |
|
140 |
9-10Y |
70 |
63 |
76 |
140 |
27,5 |
24,75 |
30 |
55 |
|
146 |
10-11Y |
73 |
64 |
79 |
146 |
28,75 |
25,25 |
31 |
57,5 |
|
152 |
11-12Y |
76 |
66 |
82 |
152 |
30 |
26 |
32,25 |
59,75 |
|
158 |
12-13Y |
79 |
68 |
85 |
158 |
31 |
26,75 |
33,5 |
62,25 |
|
164 |
13-14Y |
82 |
70 |
88 |
164 |
32,25 |
27,5 |
34,75 |
64,5 |
|
Body measurements cm |
Body measurements inch |
|||||||||
|
Size |
High Bust |
Bust |
Waist |
Hip |
Height |
High Bust |
Bust |
Waist |
Hip |
Height |
|
AA |
77 |
82 |
66 |
88 |
168 |
20,25 |
32,25 |
26 |
34,75 |
5 feet 6" |
|
BB |
81 |
86 |
70 |
92 |
168 |
31,75 |
33,75 |
27,5 |
36,25 |
5 feet 6" |
|
CC |
85 |
90 |
74 |
96 |
168 |
33,5 |
35,5 |
29,25 |
37,75 |
5 feet 6" |
|
DD |
89 |
94 |
78 |
100 |
168 |
35 |
37 |
30,75 |
39,25 |
5 feet 6" |
|
EE |
93 |
98 |
82 |
104 |
168 |
36,5 |
38,5 |
32,25 |
41 |
5 feet 6" |
|
FF |
97 |
102 |
86 |
108 |
168 |
38,25 |
40,25 |
33,75 |
42,5 |
5 feet 6" |
|
GG |
103 |
108 |
92,5 |
114 |
168 |
40,5 |
42,5 |
36,5 |
44,75 |
5 feet 6" |
|
HH |
109 |
114 |
99 |
120 |
168 |
43 |
44,75 |
39 |
47,25 |
5 feet 6" |
|
II |
115 |
120 |
105,5 |
126 |
168 |
45,25 |
47,25 |
41,5 |
49,5 |
5 feet 6" |
|
JJ |
121 |
126 |
112 |
132 |
168 |
47,75 |
49,5 |
44 |
52 |
5 feet 6" |
| KK | 127 | 132 | 118,5 | 138 | 168 | 50 | 52 | 46,75 | 54,25 | 5 feet 6" |
| LL | 133 | 138 | 125 | 144 | 168 | 52,25 | 54,25 | 49,25 | 56,75 | 5 feet 6" |
| MM | 139 | 144 | 131,5 | 150 | 168 | 54,75 | 56,75 | 51,75 | 59 | 5 feet 6" |
| NN | 145 | 150 | 138 | 156 | 168 | 57 | 59 | 54,25 | 61,5 | 5 feet 6" |

Wilma
January 19, 2021
Wauwie dit is echt een leuke hack!